NS3
0. Ref link
- https://docs.gitlab.com/ee/gitlab-basics/ ⇒ waf
- https://docs.gitlab.com/ee/gitlab-basics/ ⇒ gitlab
- https://gitlab.com/nsnam/ ⇒ nsnam
- http://www.cplusplus.com/doc/tutorial/ ⇒ C++
- https://en.wikipedia.org/wiki/GNU_toolchain ⇒ gnu toolchain
- http://cs.baylor.edu/~donahoo/practical/CSockets/ ⇒ Socket
1. Download
1.1 Git
$ mkdir workspace
$ cd workspace
$ git clone https://gitlab.com/nsnam/ns-3-allinone.git
$ cd ns-3-allinone

$ ls
build.py constants.py download.py README util.py

$ python3 download.py

$ python3 download.py -n ns-3.32  # using the -n flag to specify a release number
1.2 Bake
$ cd
$ mkdir workspace
$ cd workspace
$ git clone https://gitlab.com/nsnam/bake.git

$ cd bake
$ ls
bake bakeconf.xml bake.py doc examples generate-binary.py test TODO

$ export BAKE_HOME=`pwd`
$ export PATH=$PATH:$BAKE_HOME:$BAKE_HOME/build/bin
$ export PYTHONPATH=$PYTHONPATH:$BAKE_HOME:$BAKE_HOME/build/lib

$ ./bake.py configure -e ns-3.32

$ ./bake.py check

$ ./bake.py download

$ cd source
$ ls
netanim-3.108 ns-3.32 pybindgen
2. Build
2.1 build with waf
$ cd ns-3.32

$ ./waf clean  # clean before build, not need every time

# config before build
$ ./waf configure --build-profile=debug --enable-examples --enable-tests

# build
$ ./waf

# check which profile
$ ./waf --check-profile

# example:
# 1.disable python
./waf configure --disable-python
# 2.disable treating warring as errors
./waf configure --disable-werror --enable-examples --enable-tests
# help cmd
# ./waf --help
chenjianxing@FA001549 ~/open_proj/ns-3-allinone/ns-3.32 ➦ c147ce83a ./waf --help
waf [commands] [options]
Main commands (example: ./waf build -j4)
build : executes the build
check : run the equivalent of the old ns-3 unit tests using test.py
clean : cleans the project
configure : configures the project
dist : makes a tarball for redistributing the sources
distcheck : checks if the project compiles (tarball from 'dist')
docs : build all the documentation: doxygen, manual, tutorial, models
doxygen : do a full build, generate the introspected doxygen and then the doxygen
install : installs the targets on the system
list : lists the targets to execute
print_module_names: Print the list of module names in 3 columns.
shell : run a shell with an environment suitably modified to run locally built programs
sphinx : build the Sphinx documentation: manual, tutorial, models
step : executes tasks in a step-by-step fashion, for debugging
uninstall : removes the targets installed
Options:
--version show program's version number and exit
-c COLORS, --color=COLORS
whether to use colors (yes/no/auto) [default: auto]
-j JOBS, --jobs=JOBS amount of parallel jobs (12)
-k, --keep continue despite errors (-kk to try harder)
-v, --verbose verbosity level -v -vv or -vvv [default: 0]
--zones=ZONES debugging zones (task_gen, deps, tasks, etc)
-h, --help show this help message and exit
-d BUILD_PROFILE, --build-profile=BUILD_PROFILE
Specify the build profile. Build profiles control the default compilation flags used for C/C++ programs,
if CCFLAGS/CXXFLAGS are not set in the environment. [Allowed Values: 'debug', 'optimized', 'release']
--check-profile print out current build profile
--disable-werror disable -Werror flag (warnings treated as errors
--check-config Print the current configuration.
--cwd=CWD_LAUNCH Set the working directory for a program.
--enable-gcov Enable code coverage analysis. WARNING: this option only has effect with the configure command.
--no-task-lines Don't print task lines, i.e. messages saying which tasks are being executed by WAF. Coupled with a single
-v will cause WAF to output only the executed commands, just like 'make' does by default.
--lcov-report Generate a code coverage report (use this option after configuring with --enable-gcov and running a
program)
--lcov-zerocounters Zero the lcov counters(use this option before rerunning a program, when generating repeated lcov reports)
--run=RUN Run a locally built program; argument can be a program name, or a command starting with the program name.
--run-no-build=RUN_NO_BUILD
Run a locally built program without rebuilding the project; argument can be a program name, or a command
starting with the program name.
--visualize Modify --run arguments to enable the visualizer
--command-template=COMMAND_TEMPLATE
Template of the command used to run the program given by --run; It should be a shell command string
containing %s inside, which will be replaced by the actual program.
--pyrun=PYRUN Run a python program using locally built ns3 python module; argument is the path to the python program,
optionally followed by command-line options that are passed to the program.
--pyrun-no-build=PYRUN_NO_BUILD
Run a python program using locally built ns3 python module without rebuilding the project; argument is the
path to the python program, optionally followed by command-line options that are passed to the program.
--gdb Change the default command template to run programs and unit tests with gdb
--valgrind Change the default command template to run programs and unit tests with valgrind
--shell DEPRECATED (run ./waf shell)
--enable-sudo Use sudo to setup suid bits on ns3 executables.
--enable-tests Build the ns-3 tests.
--disable-tests Do not build the ns-3 tests.
--enable-examples Build the ns-3 examples.
--disable-examples Do not build the ns-3 examples.
--check DEPRECATED (run ./test.py)
--enable-static Compile NS-3 statically: works only on linux, without python
--enable-mpi Compile NS-3 with MPI and distributed simulation support
--doxygen-no-build Run doxygen to generate html documentation from source comments, but do not wait for ns-3 to finish the
full build.
--docset Create Docset, without building. This requires the docsetutil tool from Xcode 9.2 or earlier. See Bugzilla
2196 for more details.
--enable-des-metrics Log all events in a json file with the name of the executable (which must call CommandLine::Parse(argc,
argv)
--cxx-standard=CXX_STANDARD
Compile NS-3 with the given C++ standard
--enable-asserts Enable the asserts regardless of the compile mode
--enable-logs Enable the logs regardless of the compile mode
--enable-rpath Link programs with rpath (normally not needed, see --run and --shell; moreover, only works in some
specific platforms, such as Linux and Solaris)
--enable-modules=ENABLE_MODULES
Build only these modules (and dependencies)
--boost-includes=BOOST_INCLUDES
path to the boost includes root (~boost root) e.g.
/path/to/boost_1_47_0
--boost-libs=BOOST_LIBS
path to the directory where the boost libs are e.g.
/path/to/boost_1_47_0/stage/lib
--boost-mt select multi-threaded libraries
--boost-abi=BOOST_ABI
select libraries with tags (gd for debug, static is automatically added),
see doc Boost, Getting Started, chapter 6.1
--boost-linkage_autodetect
auto-detect boost linkage options (don't get used to it / might break other stuff)
--boost-toolset=BOOST_TOOLSET
force a toolset e.g. msvc, vc90, gcc, mingw, mgw45
(default: auto)
--boost-python=BOOST_PYTHON
select the lib python with this version (default: 36)
--with-brite=WITH_BRITE
Use BRITE integration support, given by the indicated path, to allow the use of the BRITE topology
generator
--with-nsclick=WITH_NSCLICK
Path to Click source or installation prefix for NS-3 Click Integration support
--disable-nsclick Disable NS-3 Click Integration support
--disable-gtk Disable GTK+ support
--int64x64=INT64X64_IMPL
Force the choice of int64x64_t implementation (normally only for debugging). The supported
implementations use int128_t, cairo_int128, or long double. The int128_t implementation (the preferred
option) requires compiler support. The cairo implementation fallback provides exactly the same numerical
results, but possibly at lower execution speed. The long double implementation may not provide the same
numerical results because the implementation-defined numerical precision may be less than the other
implementations. [Allowed Values: 'default', 'int128', 'cairo', 'double']
--disable-pthread Whether to enable the use of POSIX threads
--check-version Print the current build version
--enable-build-version
Check git repository for changes and update build versionduring waf build
--force-planetlab Forces compilation of PlanetLab even if not supported by the local system
--with-nsc=WITH_NSC Use Network Simulation Cradle, given by the indicated path, to allow the use of real-world network stacks
--disable-nsc Disable Network Simulation Cradle support
--with-openflow=WITH_OPENFLOW
Path to OFSID source for NS-3 OpenFlow Integration support
--disable-python Don't build Python bindings.
--apiscan=MODULE[,MODULE...]
Rescan the API for the indicated module(s), for Python bindings. Needs working CastXML / pygccxml
environment. The metamodule 'all' expands to all available ns-3 modules.
--with-pybindgen=WITH_PYBINDGEN
Path to an existing pybindgen source tree to use.
--with-python=WITH_PYTHON
Path to the Python interpreter to use.
Configuration options:
-o OUT, --out=OUT build dir for the project
-t TOP, --top=TOP src dir for the project
--check-c-compiler=CHECK_C_COMPILER
list of C compilers to try [gcc clang icc]
--check-cxx-compiler=CHECK_CXX_COMPILER
list of C++ compilers to try [g++ clang++ icpc]
Build and installation options:
-p, --progress -p: progress bar; -pp: ide output
--targets=TARGETS task generators, e.g. "target1,target2"
Step options:
--files=FILES files to process, by regexp, e.g. "*/main.c,*/test/main.o"
Installation and uninstallation options:
-f, --force force file installation
--distcheck-args=ARGS
arguments to pass to distcheck
Installation prefix:
By default, "waf install" will put the files in "/usr/local/bin", "/usr/local/lib" etc. An installation prefix other than
"/usr/local" can be given using "--prefix", for example "--prefix=$HOME"
--prefix=PREFIX installation prefix [default: '/usr/local/']
--destdir=DESTDIR installation root [default: '']
--exec-prefix=EXEC_PREFIX
installation prefix for binaries [PREFIX]
Installation directories:
--bindir=BINDIR user commands [EXEC_PREFIX/bin]
--sbindir=SBINDIR system binaries [EXEC_PREFIX/sbin]
--libexecdir=LIBEXECDIR
program-specific binaries [EXEC_PREFIX/libexec]
--sysconfdir=SYSCONFDIR
host-specific configuration [PREFIX/etc]
--sharedstatedir=SHAREDSTATEDIR
architecture-independent variable data [PREFIX/com]
--localstatedir=LOCALSTATEDIR
variable data [PREFIX/var]
--libdir=LIBDIR object code libraries [EXEC_PREFIX/lib]
--includedir=INCLUDEDIR
header files [PREFIX/include]
--oldincludedir=OLDINCLUDEDIR
header files for non-GCC compilers [/usr/include]
--datarootdir=DATAROOTDIR
architecture-independent data root [PREFIX/share]
--datadir=DATADIR architecture-independent data [DATAROOTDIR]
--infodir=INFODIR GNU "info" documentation [DATAROOTDIR/info]
--localedir=LOCALEDIR
locale-dependent data [DATAROOTDIR/locale]
--mandir=MANDIR manual pages [DATAROOTDIR/man]
--docdir=DOCDIR documentation root [DATAROOTDIR/doc/PACKAGE]
--htmldir=HTMLDIR HTML documentation [DOCDIR]
--dvidir=DVIDIR DVI documentation [DOCDIR]
--pdfdir=PDFDIR PDF documentation [DOCDIR]
--psdir=PSDIR PostScript documentation [DOCDIR]
Python Options:
--nopyc Do not install bytecode compiled .pyc files (configuration) [Default:install]
--nopyo Do not install optimised compiled .pyo files (configuration) [Default:install]
--nopycache Do not use __pycache__ directory to install objects [Default:auto]
--python=PYTHON python binary to be used [Default: /home/chenjianxing/.espressif/python_env/idf4.4_py3.6_env/bin/python3]
--pythondir=PYTHONDIR
Installation path for python modules (py, platform-independent .py and .pyc files)
--pythonarchdir=PYTHONARCHDIR
Installation path for python extension (pyext, platform-dependent .so or .dylib files)
3. Example
3.1 tutorial/first: PPP网络的实现示例
tutorial/first是一个简单的网络模拟脚本,它拥有着与所有ns-3网络模拟脚本相同的编写逻辑:构建拓扑-> 安装协议 -> 运行模拟。
构建拓扑
  NodeContainer nodes;
  nodes.Create (2);

  PointToPointHelper pointToPoint;
  pointToPoint.SetDeviceAttribute ("DataRate", StringValue ("5Mbps"));
  pointToPoint.SetChannelAttribute ("Delay", StringValue ("2ms"));

  NetDeviceContainer devices;
  devices = pointToPoint.Install (nodes);
该脚本首先创建两个节点,这两个节点是通用的,只根据其中安装的设备(Device)产生区别。除节点之外,拓扑的构建还需要信道对象,这里用PointToPointHelper助手类可以设置信道和设备的默认属性,并通过Install()成员函数可以直接创建信道和设备并进行连接。使用助手类构建拓扑的过程隐藏了很多内部实现的细节,但对于希望使用者来说是足够的。这段代码可以简化为这个形式:
  NodeContainer nodes;
  nodes.Create (2);

  PointToPointHelper pointToPoint;
  pointToPoint.Install (nodes);
这是使用创建一个PPP网络拓扑最核心的步骤,对于另一种有线网络总线CSMA网络来说,采取的方式是类似的。但想要构建Wi-Fi这种无线网络的拓扑会稍微复杂一些,这会在后边的小节中给出介绍。
安装协议
在网络拓扑之上,我们需要为我们的设备安装TCP/IP协议栈,以及应用层的应用程序。
    InternetStackHelper stack;
    stack.Install (nodes);

    Ipv4AddressHelper address;
    address.SetBase ("10.1.1.0", "255.255.255.0");
    Ipv4InterfaceContainer interfaces = address.Assign (devices);
这段代码分为两部分:用InternetStackHelper助手类向节点安装TCP/IP协议栈和用Ipv4AddressHelper助手类为设备分配ip地址。这也得益于助手类,实现将复杂的TCP/IP协议栈装入节点中方便了许多。有了网络拓扑和TCP/IP协议栈,设备间就可以通过socket进行网络应用程序的编写,就如同现实中两台计算机上的应用程序是一样的。在应用层,ns-3也提供了大量的实用的应用程序。在该例中,在客户端和服务端中都使用了echo作为应用程序,可以将对方发来的数据发送回去。安装这个应用程序的方法如下:
  UdpEchoServerHelper echoServer (9);
  ApplicationContainer serverApps = echoServer.Install (nodes.Get (1));
  serverApps.Start (Seconds (1.0));
  serverApps.Stop (Seconds (10.0));

  UdpEchoClientHelper echoClient (interfaces.GetAddress (1), 9);
  echoClient.SetAttribute ("MaxPackets", UintegerValue (1));
  echoClient.SetAttribute ("Interval", TimeValue (Seconds (1.0)));
  echoClient.SetAttribute ("PacketSize", UintegerValue (1024));

  ApplicationContainer clientApps = echoClient.Install (nodes.Get (0));
  clientApps.Start (Seconds (2.0));
  clientApps.Stop (Seconds (10.0));
通过客户端和服务端的两个应用程序助手类,可以指定网络链接的ip地址、应用层数据包的属性、应用开始和停止的时间,同时也可以用来安装应用到节点。它描述了这样一个过程:
服务器端应用助手类使用socket在节点1中创建了应用从1s开始来监听9号端口,并在10s时结束。客户端助手类使用socket在节点0中创建了应用在模拟启动2s后向节点1的9号端口发送一个1024B的UDP数据包。
启动模拟
    Simulator::Run ();
    Simulator::Destroy ();
通过这两个函数,可以启动并在模拟完成后关闭模拟。
tutorial/third: Wi-Fi网络的实现示例
tutorial/third模拟了一个包含点对点和CSMA有线网络,以及Wi-Fi无线网络的混合场景。
构建拓扑
third脚本拓扑如下所示,其中Wi-Fi节点数和CSMA节点数都是可调的。
// Default Network Topology
//
//   Wifi 10.1.3.0
//                 AP
//  *    *    *    *
//  |    |    |    |    10.1.1.0
// n5   n6   n7   n0 -------------- n1   n2   n3   n4
//                   point-to-point  |    |    |    |
//                                   ================
//                                     LAN 10.1.2.0
a. PPP网络(已经在first中介绍过)
b. CSMA网络
  NodeContainer csmaNodes;
  csmaNodes.Add (p2pNodes.Get (1));//CSMA网络与PPP网络共享一个节点。
  csmaNodes.Create (nCsma);

  CsmaHelper csma;
  csma.SetChannelAttribute ("DataRate", StringValue ("100Mbps"));
  csma.SetChannelAttribute ("Delay", TimeValue (NanoSeconds (6560)));

  NetDeviceContainer csmaDevices;
  csmaDevices = csma.Install (csmaNodes);
之前介绍过,和PPP的设置方法一模一样,只是CSMA网络可以连接更多节点。在此处CSMA网络与PPP网络共享一个节点。
c. WiFi网络
  NodeContainer wifiStaNodes;
  wifiStaNodes.Create (nWifi);
  NodeContainer wifiApNode = p2pNodes.Get (0);
首先创建节点,并存入Container中。其中AP节点其实是PPP节点中的一个,所以直接从PPP的Container中获取一个即可。这一步与PPP和CSMA并无区别。
  YansWifiChannelHelper channel = YansWifiChannelHelper::Default ();
  YansWifiPhyHelper phy;
  phy.SetChannel (channel.Create ());
这部分代码设置并创建了Channel并将其作为属性设置给了WifiPhy,实现了物理层的配置,用到了两个助手类。YansWifiChannelHelper用来创建Wifi Channel, 并且在创建之前可以为创建的Channel设置属性。Channel需要设置的属性为传播损耗模型和传播延迟模型,这两个模型被用来计算接收功率和传播延迟。之后用这个助手类创建一个Channel对象并将其作为YansWifiPhyHelper的一个属性进行设置。
除了Yans物理层,ns-3还支持频谱(spectrum)物理层实现,具体的使用方法相同,只是助手类由YansWifiChannelHelper和YansWifiPhyHelper变为了SpectrumWifiChannelHelper和SpectrumWifiPhyHelper。
  WifiHelper wifi;
  wifi.SetRemoteStationManager ("ns3::AarfWifiManager");//配置速率控制算法

  WifiMacHelper mac;
  Ssid ssid = Ssid ("ns-3-ssid");
  mac.SetType ("ns3::StaWifiMac",
               "Ssid", SsidValue (ssid),
               "ActiveProbing", BooleanValue (false));

  NetDeviceContainer staDevices;
  staDevices = wifi.Install (phy, mac, wifiStaNodes);

  mac.SetType ("ns3::ApWifiMac",
               "Ssid", SsidValue (ssid));

  NetDeviceContainer apDevices;
  apDevices = wifi.Install (phy, mac, wifiApNode);
这部分代码用来配置MAC属性并在节点中安装NetDevice。配置mac属性需要使用WifiMacHelper,在这里用这个助手类设置了节点的类型(AP/STA)和AP的ssid等属性,依托这个助手类,我们可以一次配置许多个节点的MAC层属性,在无线局域网中可以一次配置多个STA节点。MAC层配置好后,就回到了和配置PPP网络一样的步骤:用wifiHelper配置MAC和PHY到节点并将返回的设备对象存入Device Container容器中。
在有线网络中,网络拓扑的构建到现在已经结束了。但在无线网络中,节点之间存在相对位置的关系,节点之间的距离会改变信道的属性,所以在本例中还需亚设置移动模型。
  MobilityHelper mobility;

  mobility.SetPositionAllocator ("ns3::GridPositionAllocator",
                                 "MinX", DoubleValue (0.0),
                                 "MinY", DoubleValue (0.0),//起始坐标
                                 "DeltaX", DoubleValue (5.0),
                                 "DeltaY", DoubleValue (10.0),//X,Y轴的节点间距
                                 "GridWidth", UintegerValue (3),//每行最大节点数
                                 "LayoutType", StringValue ("RowFirst"));//排列在一行
  mobility.SetMobilityModel ("ns3::RandomWalk2dMobilityModel",
                             "Bounds", RectangleValue (Rectangle (-50, 50, -50, 50)));
  mobility.Install (wifiStaNodes);

  mobility.SetMobilityModel ("ns3::ConstantPositionMobilityModel");
  mobility.Install (wifiApNode);
该例中设置了一个在2D平面内随机移动的模型并安装到了STA上,同时为AP安装了一个不移动的模型。设置移动模型属性的方法与之前相同,都是使用助手类,设置好属性后用助手类的Install()函数将移动模型安装到节点上。
Wi-Fi网络相较于有有线网络的拓扑构建要复杂一些,究其原因是使用者需要对无线网络的MAC与PHY层进行属性的配置,并且要设定移动模型。但他们的实现都是对助手类的API调用,套路基本上是一样的。
安装协议
  InternetStackHelper stack;
  stack.Install (csmaNodes);
  stack.Install (wifiApNode);
  stack.Install (wifiStaNodes);
为所有节点安装TCP/IP协议栈,只需要一个助手类便可为所有节点安装协议。
  Ipv4AddressHelper address;

  address.SetBase ("10.1.1.0", "255.255.255.0");
  Ipv4InterfaceContainer p2pInterfaces;
  p2pInterfaces = address.Assign (p2pDevices);

  address.SetBase ("10.1.2.0", "255.255.255.0");
  Ipv4InterfaceContainer csmaInterfaces;
  csmaInterfaces = address.Assign (csmaDevices);

  address.SetBase ("10.1.3.0", "255.255.255.0");
  address.Assign (staDevices);
  address.Assign (apDevices);
分配ip地址,和first里也是相同的。
  UdpEchoServerHelper echoServer (9);

  ApplicationContainer serverApps = echoServer.Install (csmaNodes.Get (nCsma));
  serverApps.Start (Seconds (1.0));
  serverApps.Stop (Seconds (10.0));

  UdpEchoClientHelper echoClient (csmaInterfaces.GetAddress (nCsma), 9);
  echoClient.SetAttribute ("MaxPackets", UintegerValue (1));
  echoClient.SetAttribute ("Interval", TimeValue (Seconds (1.0)));
  echoClient.SetAttribute ("PacketSize", UintegerValue (1024));

  ApplicationContainer clientApps =
    echoClient.Install (wifiStaNodes.Get (nWifi - 1));
  clientApps.Start (Seconds (2.0));
  clientApps.Stop (Seconds (10.0));
和first里完全相同的应用。
Ipv4GlobalRoutingHelper::PopulateRoutingTables ();
由于存在多个子网之间的通信,所以需要在脚本中设置路由协议。这是一个static修饰的函数,所以我们不需要实际的Ipv4GlobalRoutingHelper对象。此处设置路由为全局路由。
Tracing部分
Trace变量作为ns-3的一个强大的数据跟踪工具,是使用ns-3所必须了解的。
  if (tracing == true)
    {
      pointToPoint.EnablePcapAll ("third");
      phy.EnablePcap ("third", apDevices.Get (0));
      csma.EnablePcap ("third", csmaDevices.Get (0), true);
    }
在此处,脚本追踪了ap节点PHY层和csma的第0个节点的数据包并输出为PCAP文件。在之后的文章中会详细介绍ns-3的Trace变量机制。
Attribute和Trace变量
Attribute(属性)和trace都是ns-3中类的成员变量,这两种变量是对网络行为进行定制和观察的重要模块。属性是网络模拟中的用户可配置参数,例如我们可以设置PPP设备的DataRate属性来改变设备的传输速率。Trace是一个指向函数的指针,我们可以指定某个网络元素的trace指针指向一个回调函数,每当特定的网络事件发生时,系统就会调用回调函数,从而达到追踪网络在某一时刻行为的效果。
设置属性变量
设置属性变量有三种方式,可以根据使用的场景来选择最合适的方式
- 助手类
这种方式在对象创建之前使用,他们设定的是助手类创建对象时的默认值,只需要设置一次就可以创建多个对象。以此种方式设置属性,是不会改变已创建的对象的。若存在部分属性不同的同类对象,只需要设置不同的属性即可。例如:用助手类设置AP和Sta的Mac层:Ssid ssid = Ssid ("AP"); wifiMac.SetType ("ns3::StaWifiMac", "Ssid", SsidValue (ssid)); wifiStaDevices.Add (wifi.Install (wifiPhy, wifiMac, wifiStaNodes.Get (0))); ssid = Ssid ("AP"); wifiMac.SetType ("ns3::ApWifiMac", "Ssid", SsidValue (ssid)); wifiApDevices.Add (wifi.Install (wifiPhy, wifiMac, wifiApNodes.Get (0)));可以看到,我们通过同一个助手类对象
wifimac设置了AP和Sta两个不同节点的mac层属性。 -
ObjectBase::SetAttribute()函数
ObjectBase类是绝大多数网络元素的基类,如Node、NetDevice和Channel类。通过这些类的成员函数SetAttribute()可以直接设置网络元素对象的属性值,即其可以对已经创建好的网络元素对象的属性进行设置。例如:wifi-aggregation中用ObjectBase::SetAttribute()设置最大AMPDU的长度:Ptr<NetDevice> dev = wifiStaNodes.Get (1)->GetDevice (0); Ptr<WifiNetDevice> wifi_dev = DynamicCast<WifiNetDevice> (dev); wifi_dev->GetMac ()->SetAttribute ("BE_MaxAmpduSize", UintegerValue (0));我们只需要关注第三行代码,它在
wifiNetDevice对象中获取Mac成员,为Mac设置属性变量。这种方式不如助手类设置简单,需要找到对应的对象才可以设置属性,但对于脚本编写者来说,对象的创建基本都是通过助手类。另外,这种方式一次只能设置一个对象的属性,如果想要一次设置多个对象的属性的话,第三种方法更加简便。 Config::SetDefault()和Config::Set()函数
Config命名空间嵌套于ns3命名空间,这个命名空间中的函数主要是用来配置属性和trace变量的。从函数名中即可看出,Config::SetDefault()是像助手类那样设置默认值,而Config::Set()是直接设置网络元素对象的属性。两者用法相同,前者和助手类的作用没有区别,而后者可以一次设置多个网络元素对象的属性。例如:用Config::Set()设置PHY层的频宽Config::Set ("/NodeList/*/DeviceList/*/$ns3::WifiNetDevice/Phy/ChannelWidth", UintegerValue (chWidth));函数的第一个形参为
path,即属性的命名空间路径。*表示全部,若指定其中之一,则可以用从0开始的序号(如节点序号)代替*。以下是几条配置路径的普适规则:- 对象路径从左到右,遵循范围从大到小的原则。
- 绝大部分的对象配置路径都从
/NodeList/或/ChannelList/开始。其中NodeList存储了脚本中所有已创建的节点对象。ChannelList存储了脚本中所有已创建的信道对象。所有的属性要么依附于节点存在,要么依附于信道存在:如方法二的例子中,Mac对象是依附于WifiNetDevice存在的。 - 对于一个节点,访问其
Application对象要从/NodeList/<节点序号>/ApplicationList/开始。访问其NetDevice对象需要从/NodeList/<节点序号>/DeviceList/开始。
注:属性变量可以在
Doxygen网站上查找
设置trace变量
Config::Connect()
该函数将用户定义的回调函数指针赋值给trace变量。函数的两个参数分别为命名空间路径和函数指针。例如:追踪所有PPP网络设备对象的MacTx trace变量,每当设备发送分组时,MacTxCallback()函数就会被执行Config::Connect("/NodeList/*/DeviceList/*/$ns3::PointToPointNetDevice/MacTx",MakeCallback(&MacTxCallback));回调函数需要有特定的返回值和参数列表,这些都可以在
Doxygen网站上查找到。其中,第一个形参均为std::string::context,传入命名空间路径。若在回调函数中没有用到context这个参数,可以使用函数Config::ConnectWithoutContext(),则此回调函数不需要有context作为形参。
除了Config命名空间的两个函数,还有ObjectBase::TraceConnect()和ObjectBase::TraceConnectWithoutContext()。这两个函数可以直接对对象设置trace变量,但一次只能设置一个对象。这两个函数的第一个形参为trace变量名而不用命名空间路径。- 助手类
-
NetDevice助手类
| trace配置函数 | 含义 | 文件格式 | | :———–: | :—————————-: | :——: | | EnableAscii() | 为指定节点配置trace | ASCII | | EnableAsciiAll() | 为该助手类所创建的所有节点配置trace | ASCII | | EnablePcap() | 为指定节点配置trace | pcap | | EnablePcapAll() | 为该助手类所创建的所有节点配置trace | pcap |例如:
third例子中生成PPP、csma和ap的pcap追踪信息if (tracing == true) { pointToPoint.EnablePcapAll ("third"); phy.EnablePcap ("third", apDevices.Get (0)); csma.EnablePcap ("third", csmaDevices.Get (0), true); }可以看到,这段程序追踪两个PPP节点收发的分组,ap物理层收发的分组和csma设备收发的分组。生成的文件命名规则为
前缀名-<节点标号>-<网络设备标号>。
这三个trace变量跟踪的节点其实就是PPP的两个节点,这两个节点最先创建,分别为节点0和节点1。对于节点0来说,它同时也是Wi-Fi中的Ap,它首先安装PPP设备,然后安装Wifi的PHY和Mac;所以PPP设备标号为0,PHY设备标号为1,Mac设备标号为2。节点1同理,PPP设备标号为0,csma设备标号为1。所以生成的pacp文件依次为third-0-0.pcap、third-1-0.pcap、third-0-1.pcap和third-1-1.pcap。 -
InternetStackHelper助手类
| trace配置函数 | 含义 | 文件格式 | | :———–: | :—————————-: | :——: | | EnableAsciiIpv4() | 为指定IPv4节点配置trace | ASCII | | EnableAsciiIpv4All() | 为该助手类所创建的所有IPv4节点配置trace | ASCII | | EnableAsciiIpv6() | 为指定IPv6节点配置trace | ASCII | | EnableAsciiIpv6All() | 为该助手类所创建的所有IPv6节点配置trace | ASCII | | PcapHelperForIpv4() | 为指定IPv4节点配置trace | pcap | | PcapHelperForIpv4All() | 为该助手类所创建的所有IPv4节点配置trace | pcap | | PcapHelperForIpv6() | 为指定IPv6节点配置trace | pcap | | PcapHelperForIpv6All() | 为该助手类所创建的所有IPv6节点配置trace | pcap |用法和设备助手类基本一样。
-
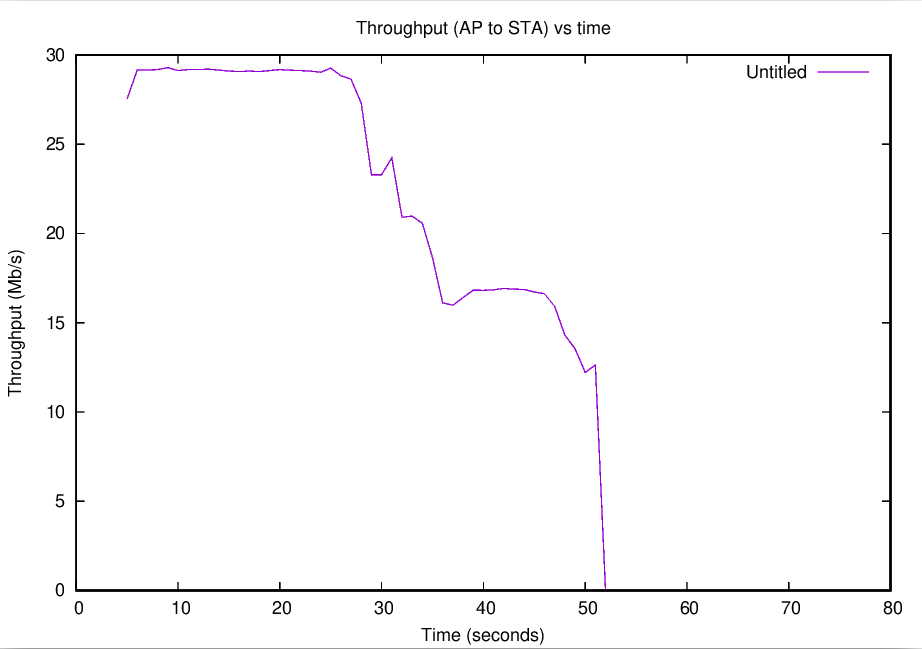
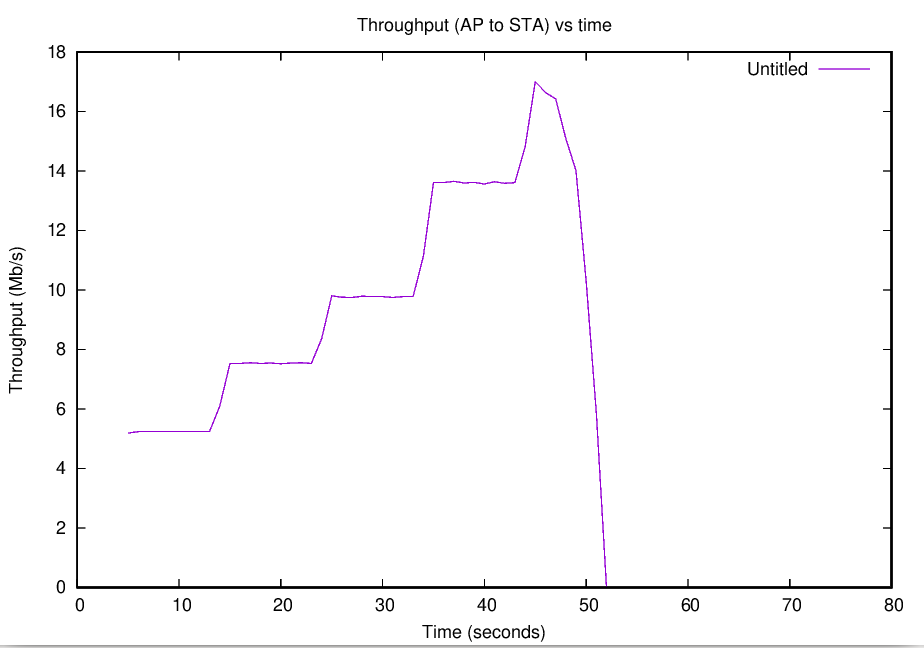
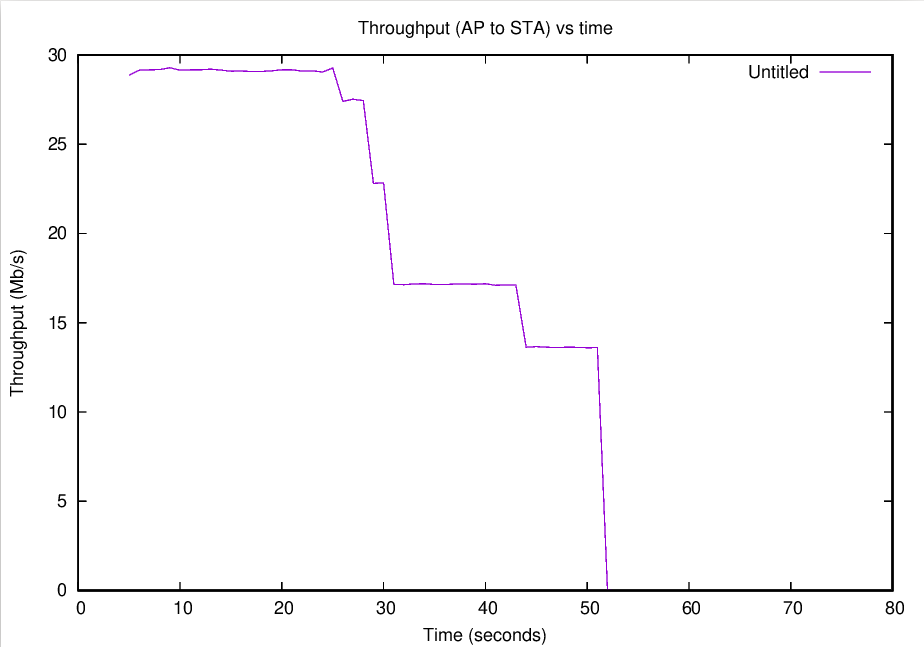
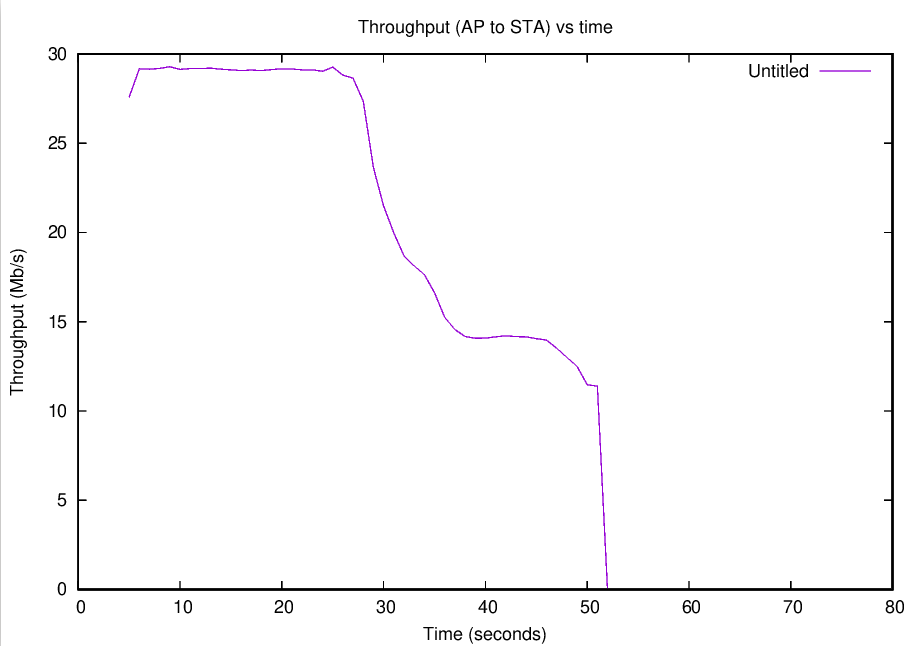
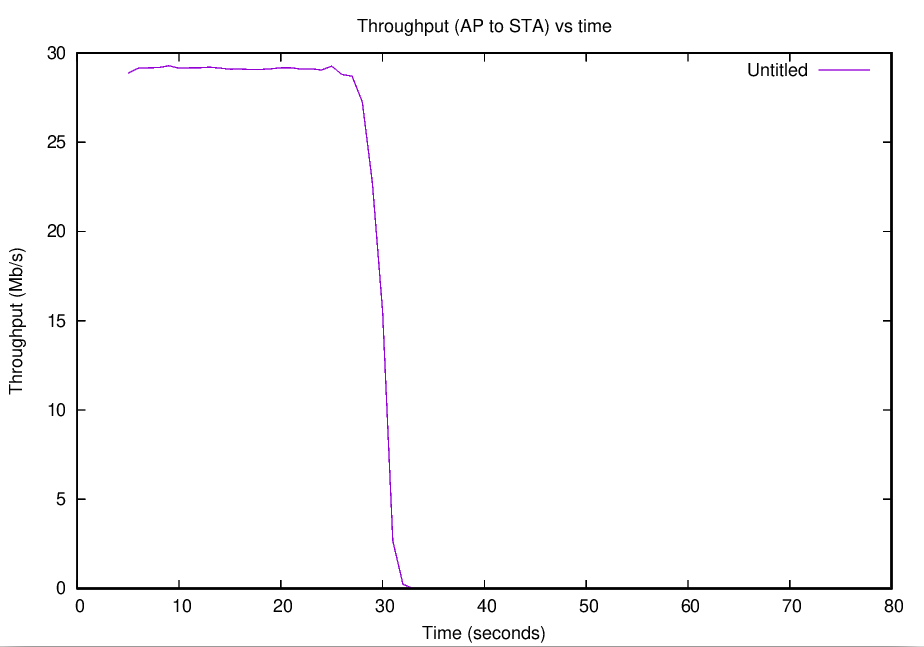
3.2 examples/wireless/wifi-rate-adaptation-distance: Wi-Fi速率控制算法的模拟示例
相比于前两个存在于tutorial中的脚本,这个脚本要庞大不少,并且模拟了一个十分实用的现实场景。从这个脚本的名字中便可以看出其功能:Wi-Fi速率随距离变化行为的模拟。虽然场景更复杂了,但其核心思想还是没有变,只是拓扑更复杂了(本例中并没有)、需要设置和追踪的对象变多了而已。
构建拓扑
本例的拓扑十分简单,仅仅是一个STA与一个AP链接,并且STA逐渐远离AP。
  // Define the APs
  NodeContainer wifiApNodes;
  wifiApNodes.Create (1);

  //Define the STAs
  NodeContainer wifiStaNodes;
  wifiStaNodes.Create (1);
首先创建节点,这在任何网络中无疑都是首要工作。
  YansWifiPhyHelper wifiPhy;
  YansWifiChannelHelper wifiChannel = YansWifiChannelHelper::Default ();
  wifiPhy.SetChannel (wifiChannel.Create ());
接着创建Channel并将其设置给WifiPhy,这里的Channel依然采用默认配置。
  NetDeviceContainer wifiApDevices;
  NetDeviceContainer wifiStaDevices;
  NetDeviceContainer wifiDevices;
从这里开始与之前有一些不同了,之前的代码中会对STA和AP分别配置MAC属性并在节点中安装Device。但这里先将设备容器创建了出来,这是因为后边要根据协议的不同来进行不同的配置:
-
802.11a/b/g 采取同样的方法配置:
  if (standard == "802.11a" || standard == "802.11b" || standard == "802.11g")
    {
      if (standard == "802.11a")
        {
          wifi.SetStandard (WIFI_STANDARD_80211a);
        }
      else if (standard == "802.11b")
        {
          wifi.SetStandard (WIFI_STANDARD_80211b);
        }
      else if (standard == "802.11g")
        {
          wifi.SetStandard (WIFI_STANDARD_80211g);
        }//设置wifi的协议版本
      WifiMacHelper wifiMac;

      //Configure the STA node
      wifi.SetRemoteStationManager (staManager, "RtsCtsThreshold", UintegerValue (rtsThreshold));

      Ssid ssid = Ssid ("AP");
      wifiMac.SetType ("ns3::StaWifiMac",
                       "Ssid", SsidValue (ssid));
      wifiStaDevices.Add (wifi.Install (wifiPhy, wifiMac, wifiStaNodes.Get (0)));//给STA Nodes安装Device

      //Configure the AP node
      wifi.SetRemoteStationManager (apManager, "RtsCtsThreshold", UintegerValue (rtsThreshold));

      ssid = Ssid ("AP");
      wifiMac.SetType ("ns3::ApWifiMac",
                       "Ssid", SsidValue (ssid));
      wifiApDevices.Add (wifi.Install (wifiPhy, wifiMac, wifiApNodes.Get (0)));//给AP安装Device
    }
这里按照协议的不同对MAC进行了不同的配置,然后使用
WifiHelper::SetRemoteStationManager()函数设置了速率控制算法和RTS/CTS阈值。接下来就是为设置MAC属性并为节点安装Device,和third脚本中的操作是完全相同的。 -
802.11n
因为802.11n协议支持
AMPDU,所以要在最后配置以下AMPDU相关的属性。其余部分代码并没有区别。Config::Set ("/NodeList/*/DeviceList/*/$ns3::WifiNetDevice/Mac/BE_MaxAmpduSize", UintegerValue (BeMaxAmpduSize));//设置ampdu最大值,因为11n之前没有ampdu的机制 -
802.11ac
和
802.11n一样,需要设置AMPDU。但由于ns-3暂时还不支持VHT版本的速率控制算法,所以注释掉了速率控制的部分。其余部分代码并没有区别。
  wifiDevices.Add (wifiStaDevices);
  wifiDevices.Add (wifiApDevices);
  // Set channel width
  Config::Set ("/NodeList/*/DeviceList/*/$ns3::WifiNetDevice/Phy/ChannelWidth", UintegerValue (chWidth));

  // Set guard interval
  Config::Set ("/NodeList/*/DeviceList/*/$ns3::WifiNetDevice/HtConfiguration/ShortGuardIntervalSupported", BooleanValue (shortGuardInterval));
配置结束后将STA和AP的设备对象都存到了wifiDevices容器中方便统一管理。又通过Config::Set()设置了频带宽度和是否支持short GI,这些都可以在命令行参数中配置。
  //Initial position of AP and STA
  positionAlloc->Add (Vector (ap1_x, ap1_y, 0.0));
  positionAlloc->Add (Vector (sta1_x, sta1_y, 0.0));
  mobility.SetPositionAllocator (positionAlloc);
  mobility.SetMobilityModel ("ns3::ConstantPositionMobilityModel");
  mobility.Install (wifiApNodes.Get (0));
  mobility.Install (wifiStaNodes.Get (0));
  NodeStatistics atpCounter = NodeStatistics (wifiApDevices, wifiStaDevices);

  //Move the STA by stepsSize meters every stepsTime seconds
  Simulator::Schedule (Seconds (0.5 + stepsTime), &NodeStatistics::AdvancePosition, &atpCounter, wifiStaNodes.Get (0), stepsSize, stepsTime);
设置移动模型,这里是本例中拓扑最复杂的部分。可以看到,脚本编写者为AP和STA都安装了静止不动的移动模型,但我们的需求是想要STA逐渐远离AP。其实,编写者是自己实现了一套移动模型,只借用官方提供的移动模型设置了初始点。使用Simulator::Schedule() 函数,每经过一段时间,就移动一段距离。这就像自己设计其他部分的协议一样,即便实现的功能并不复杂,但总能获得更多的信息,从而对模拟过程进行更精准的把控。这里移动STA的函数如下所示:
void
NodeStatistics::AdvancePosition (Ptr<Node> node, int stepsSize, int stepsTime)
{
  Vector pos = GetPosition (node);
  double mbs = ((m_bytesTotal * 8.0) / (1000000 * stepsTime));
  m_bytesTotal = 0;
  m_output.Add (pos.x, mbs);
  pos.x += stepsSize;
  SetPosition (node, pos);
  Simulator::Schedule (Seconds (stepsTime), &NodeStatistics::AdvancePosition, this, node, stepsSize, stepsTime);
}
这个函数在末尾对自己进行了延时的递归调用,这样就可以每过一段时间就可以步进一段距离。在改变位置之前,先进行Throughput的计算,这样就可以把距离和速率一一对应起来。
安装协议
  //Configure the IP stack
  InternetStackHelper stack;
  stack.Install (wifiApNodes);
  stack.Install (wifiStaNodes);
  Ipv4AddressHelper address;
  address.SetBase ("10.1.1.0", "255.255.255.0");
  Ipv4InterfaceContainer i = address.Assign (wifiDevices);
  Ipv4Address sinkAddress = i.GetAddress (0);
  uint16_t port = 9;

  //Configure the CBR generator
  PacketSinkHelper sink ("ns3::UdpSocketFactory", InetSocketAddress (sinkAddress, port));
  ApplicationContainer apps_sink = sink.Install (wifiStaNodes.Get (0));

  OnOffHelper onoff ("ns3::UdpSocketFactory", InetSocketAddress (sinkAddress, port));
  onoff.SetConstantRate (DataRate ("400Mb/s"), 1420);
  onoff.SetAttribute ("StartTime", TimeValue (Seconds (0.5)));
  onoff.SetAttribute ("StopTime", TimeValue (Seconds (simuTime)));
  ApplicationContainer apps_source = onoff.Install (wifiApNodes.Get (0));

  apps_sink.Start (Seconds (0.5));
  apps_sink.Stop (Seconds (simuTime));
协议部分和之前没什么太大的区别,唯一的区别在于应用程序变为了onoff和sink。onoff即为在一段时间以设定速率发送数据,一段时间不发送数据;sink则是全部接收数据而不进行任何操作。
至此,整个网络模拟的框架已经搭建完毕了,但为了更好地了解在模拟过程中网络的行为,需要设定一些Tracing变量来追踪网络的动态。
Tracing 部分
  //Register packet receptions to calculate throughput
  Config::Connect ("/NodeList/1/ApplicationList/*/$ns3::PacketSink/Rx",
                   MakeCallback (&NodeStatistics::RxCallback, &atpCounter));
其回调函数为:
void
NodeStatistics::RxCallback (std::string path, Ptr<const Packet> packet, const Address &from)
{
  m_bytesTotal += packet->GetSize ();
}
这个回调函数在每次收到数据包的时候调用,功能是将当前受到的包的大小计算到总的接收到的数据量中,从而用来计算Throughput。
  //Callbacks to print every change of rate
  Config::ConnectFailSafe ("/NodeList/0/DeviceList/*/$ns3::WifiNetDevice/RemoteStationManager/$" + apManager + "/RateChange",
                           MakeCallback (RateCallback));
其回调函数为:
void RateCallback (std::string path, uint64_t rate, Mac48Address dest)
{
  NS_LOG_INFO ((Simulator::Now ()).GetSeconds () << " " << dest << " Rate " <<  rate / 1000000.0);
}
它在每次设备改变发送速率的时候被调用,并输出时间和速率等信息到屏幕上。
画图部分
  std::ofstream outfile (("throughput-" + outputFileName + ".plt").c_str ());
  Gnuplot gnuplot = Gnuplot (("throughput-" + outputFileName + ".eps").c_str (), "Throughput");
  gnuplot.SetTerminal ("post eps color enhanced");
  gnuplot.SetLegend ("Time (seconds)", "Throughput (Mb/s)");
  gnuplot.SetTitle ("Throughput (AP to STA) vs time");
  gnuplot.AddDataset (atpCounter.GetDatafile ());
  gnuplot.GenerateOutput (outfile);
这是ns-3提供的利用GNUPLOT画图的功能,脚本编写者可以参照这部分的写法编写脚本来更直观地追踪自己想了解的变量。
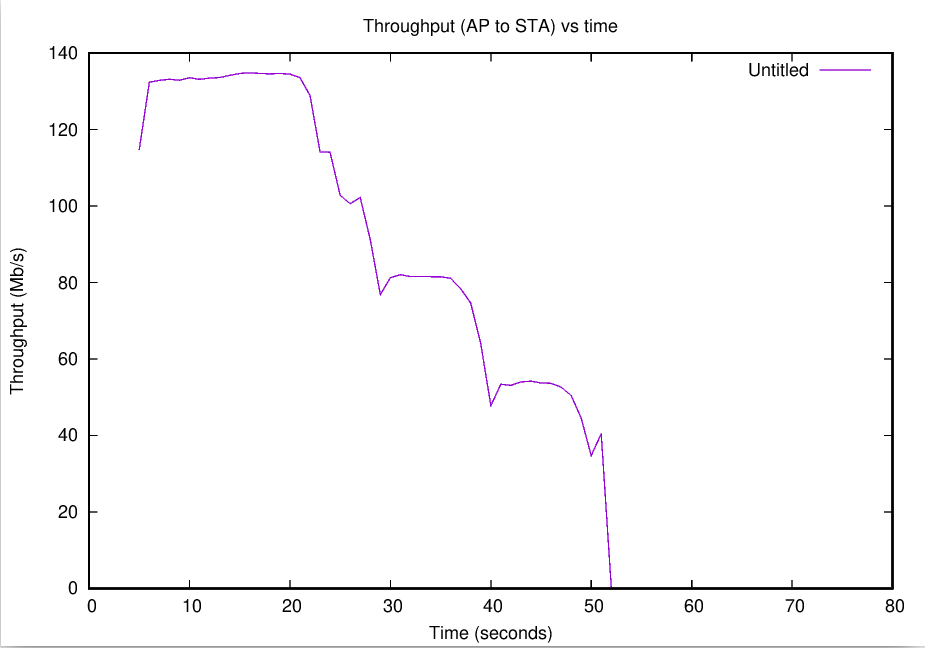
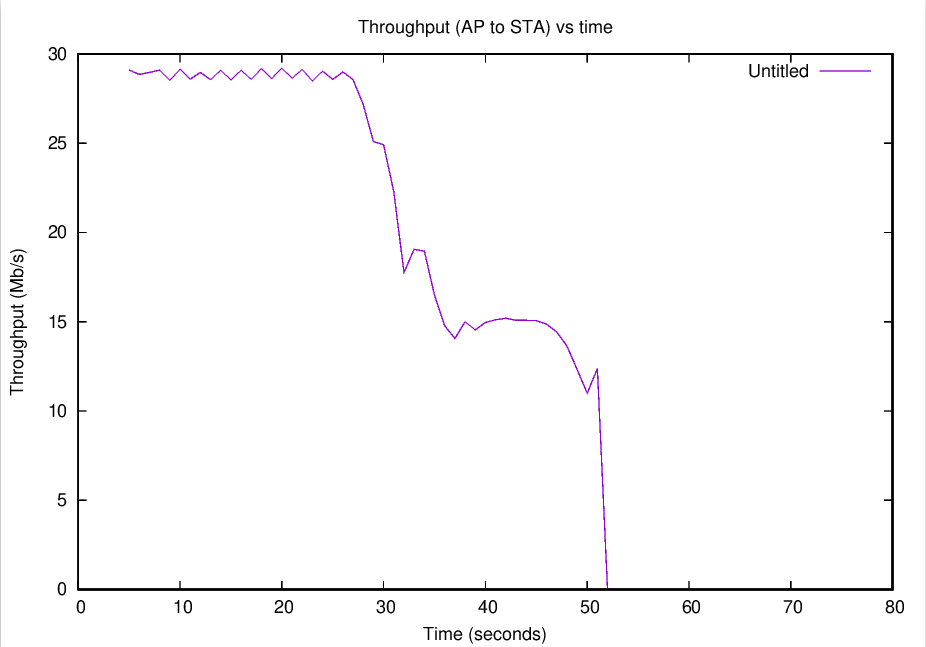
WiFi Rate Control
除了minstrelHt算法采用802.11n之外,其他均采用802.11a协议。
minstrelHt
minstrel
arf
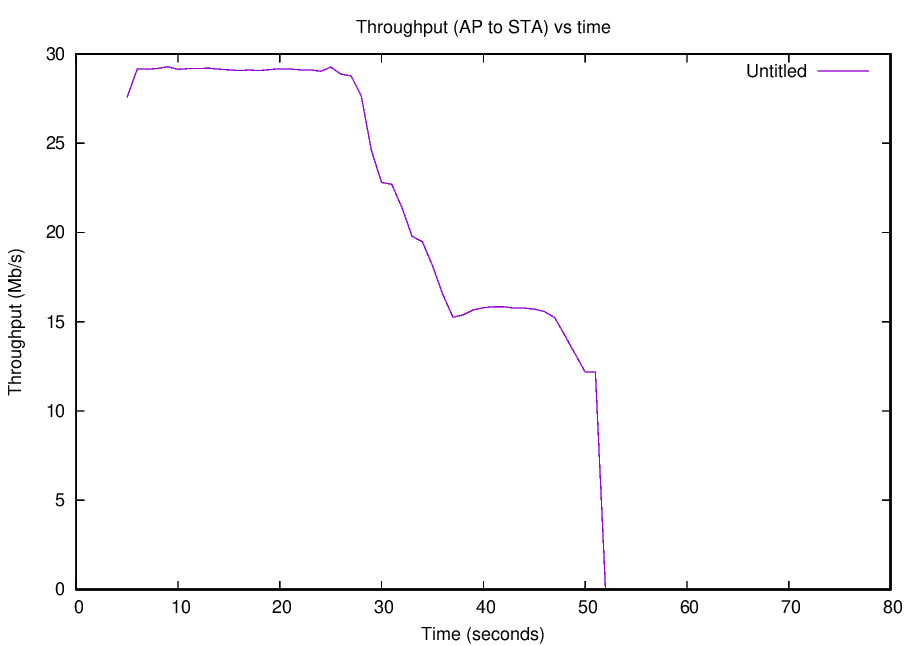
aarf

onoe
constant rate

ideal
amrr

cara
rraa
aarfcd